JPA stands for Java Persistence API, which basically is a specification that describes a way to persist data into a persistent storage, usually a database. We can think of it as something similar to ORM tools like Hibernate, except that it is an official part of the Java EE specification (and it’s also supported on Java SE).
There are many reasons to learn an ORM tool like JPA. I will not go into the details of this because there are already many posts on the web which perfectly answer this question, like this one, or this one. However, we should also keep in mind that this is not a single magic bullet which will solve our every problem.
When I first started out with JPA, I had real difficulties to set it up because most of the articles on the web are written for Java EE environment only, whereas I was trying to use it in a Java SE environment. I hope that this article will be helpful for those who wish to do the same in the future.
In this example we will use Maven to set up our required dependencies. Since JPA is only a specification, we will also need an implementation. There are many good implementations of JPA available freely (like EclipseLink, Hibernate etc.). For this article I have chosen to use Hibernate. As for the database, I will use MySQL.
Let us first create a simple maven project. I have created mine using the quick start archetype from the command line. If you do not know how to do that, you can follow this tutorial.
OK, so let us get the dependencies for the JPA next. Include the following lines in your pom.xml –
<dependency>
  <groupId>javax.persistence</groupId>
  <artifactId>persistence-api</artifactId>
  <version>1.0.2</version>
</dependency>
<dependency>
  <groupId>org.hibernate</groupId>
  <artifactId>hibernate-entitymanager</artifactId>
  <version>4.3.6.Final</version>
  <exclusions>
    <exclusion>
      <groupId>org.hibernate.javax.persistence</groupId>
      <artifactId>hibernate-jpa-2.1-api</artifactId>
    </exclusion>
  </exclusions>
</dependency>
The first dependency specifies the standard JPA interface, and the second one specifies the implementation. Including JPA dependencies this way is desirable because it gives us the freedom to switch vendor-specific implementation in the future without much problem (see details here). However we will not be able to use the latest version of the API this way because the API version 1.0.2 is the last version that is released as an independent JAR. At the time of writing this article, the latest version of the JPA specification is 2.1 which is not available independently (there are lots of requests for it though). If we want to use that one now then our only options are to choose from either a vendor-specific JAR or use an application server which provides the API along with its implementation. I have decided to use the API specification provided by Hibernate. In that case including only the following dependency will suffice –
<dependency>
  <groupId>org.hibernate</groupId>
  <artifactId>hibernate-entitymanager</artifactId>
  <version>4.3.6.Final</version>
</dependency>
Next step is to include the dependency for MySQL. Include the following lines in your pom.xml –
<dependency>
  <groupId>mysql</groupId>
  <artifactId>mysql-connector-java</artifactId>
  <version>5.1.31</version>
</dependency>
After including the rest of the dependencies (i.e., jUnit, Hamcrest etc.) the full pom.xml looks like below –
<project xmlns="http://maven.apache.org/POM/4.0.0" xmlns:xsi="http://www.w3.org/2001/XMLSchema-instance"
  xsi:schemaLocation="http://maven.apache.org/POM/4.0.0 http://maven.apache.org/xsd/maven-4.0.0.xsd">

  <modelVersion>4.0.0</modelVersion>

  <groupId>com.keertimaan.javasamples</groupId>
  <artifactId>jpa-example</artifactId>
  <version>0.0.1-SNAPSHOT</version>
  <packaging>jar</packaging>

  <name>jpa-example</name>
  <url>https://sayemdb.wordpress.com</url>

  <properties>
    <java.version>1.8</java.version>
    <hibernate.version>4.3.6.Final</hibernate.version>
    <project.build.sourceEncoding>UTF-8</project.build.sourceEncoding>
  </properties>

  <dependencies>
    <!-- JPA -->
    <dependency>
      <groupId>org.hibernate</groupId>
      <artifactId>hibernate-entitymanager</artifactId>
      <version>${hibernate.version}</version>
    </dependency>

    <!-- For connection pooling -->
    <dependency>
      <groupId>org.hibernate</groupId>
      <artifactId>hibernate-c3p0</artifactId>
      <version>${hibernate.version}</version>
    </dependency>

    <!-- Database -->
    <dependency>
      <groupId>mysql</groupId>
      <artifactId>mysql-connector-java</artifactId>
      <version>5.1.31</version>
    </dependency>

    <!-- Test -->
    <dependency>
      <groupId>junit</groupId>
      <artifactId>junit</artifactId>
      <version>4.11</version>
      <scope>test</scope>
      <exclusions>
        <exclusion>
          <groupId>org.hamcrest</groupId>
          <artifactId>hamcrest-core</artifactId>
        </exclusion>
      </exclusions>
    </dependency>
    <dependency>
      <groupId>org.hamcrest</groupId>
      <artifactId>hamcrest-all</artifactId>
      <version>1.3</version>
      <scope>test</scope>
    </dependency>
  </dependencies>

  <build>
    <plugins>
      <plugin>
        <groupId>org.apache.maven.plugins</groupId>
        <artifactId>maven-compiler-plugin</artifactId>
        <version>2.5.1</version>
        <configuration>
          <source>${java.version}</source>
          <target>${java.version}</target>
          <compilerArgument>-Xlint:all</compilerArgument>
          <showWarnings>true</showWarnings>
          <showDeprecation>true</showDeprecation>
        </configuration>
      </plugin>
    </plugins>
  </build>
</project>
Now it’s time to configure our database. I will use the following schema in all of my future JPA examples which I found from this excellent online book –
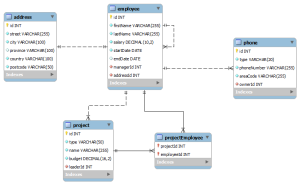
Database Schema
Create an equivalent database following the above schema in your local MySQL installation.
Our next step is to create the persistence.xml file which will contain our database specific information for JPA to use. By default JPA expects this file to be in the class path under the META-INF folder. For our maven project, I have created this file under project_root/src/main/resources/META-INF folder –
<persistence xmlns="http://xmlns.jcp.org/xml/ns/persistence" xmlns:xsi="http://www.w3.org/2001/XMLSchema-instance"
  xsi:schemaLocation="http://xmlns.jcp.org/xml/ns/persistence
  http://xmlns.jcp.org/xml/ns/persistence/persistence_2_1.xsd"
  version="2.1">

  <persistence-unit name="jpa-example" transaction-type="RESOURCE_LOCAL">
  <provider>org.hibernate.jpa.HibernatePersistenceProvider</provider>

  <properties>
    <property name="javax.persistence.jdbc.url" value="jdbc:mysql://localhost/jpa_example" />
    <property name="javax.persistence.jdbc.user" value="root" />
    <property name="javax.persistence.jdbc.password" value="my_root_password" />
    <property name="javax.persistence.jdbc.driver" value="com.mysql.jdbc.Driver" />

    <property name="hibernate.show_sql" value="true" />
    <property name="hibernate.format_sql" value="true" />
    <property name="hibernate.dialect" value="org.hibernate.dialect.MySQL5InnoDBDialect" />
    <property name="hibernate.hbm2ddl.auto" value="validate" />

    <!-- Configuring Connection Pool -->
    <property name="hibernate.c3p0.min_size" value="5" />
    <property name="hibernate.c3p0.max_size" value="20" />
    <property name="hibernate.c3p0.timeout" value="500" />
    <property name="hibernate.c3p0.max_statements" value="50" />
    <property name="hibernate.c3p0.idle_test_period" value="2000" />
    </properties>
  </persistence-unit>
</persistence>
The above file requires some explanation if you are an absolute begineer in JPA. In my next article I will try to explain it as much as possible, but for running this example you will only need to change the first three property values to match your environment (namely the database name, username and password). Also keep a note of the value of the name attribute of the persistence-unit element. This value will be used to instantiate our EntityManagerFactory instance later in the code.
Ok, let us now create an entity to test our configuration. Create a class called Address with the following contents –
import javax.persistence.Entity;
import javax.persistence.GeneratedValue;
import javax.persistence.Id;
import javax.persistence.Table;

@Entity
@Table(name = "address")
public class Address {
  @Id
  @GeneratedValue
  private Integer id;

  private String street;
  private String city;
  private String province;
  private String country;
  private String postcode;

  /**
   * @return the id
   */
  public Integer getId() {
    return id;
  }

  /**
   * @param id the id to set
   */
  public Address setId(Integer id) {
    this.id = id;
    return this;
  }

  /**
   * @return the street
   */
  public String getStreet() {
    return street;
  }

  /**
   * @param street the street to set
   */
  public Address setStreet(String street) {
    this.street = street;
    return this;
  }

  /**
   * @return the city
   */
  public String getCity() {
    return city;
  }

  /**
   * @param city the city to set
   */
  public Address setCity(String city) {
    this.city = city;
    return this;
  }

  /**
   * @return the province
   */
  public String getProvince() {
    return province;
  }

  /**
   * @param province the province to set
   */
  public Address setProvince(String province) {
    this.province = province;
    return this;
  }

  /**
   * @return the country
   */
  public String getCountry() {
    return country;
  }

  /**
   * @param country the country to set
   */
  public Address setCountry(String country) {
    this.country = country;
    return this;
  }

  /**
   * @return the postcode
   */
  public String getPostcode() {
    return postcode;
  }

  /**
   * @param postcode the postcode to set
   */
  public Address setPostcode(String postcode) {
    this.postcode = postcode;
    return this;
  }
}
This class has been properly mapped to the address table and its instances are fully ready to be persisted in the database. Now let us create a helper class called PersistenceManager with the following contents –
import javax.persistence.EntityManager;
import javax.persistence.EntityManagerFactory;
import javax.persistence.Persistence;

public enum PersistenceManager {
  INSTANCE;

  private EntityManagerFactory emFactory;

  private PersistenceManager() {
    // "jpa-example" was the value of the name attribute of the
    // persistence-unit element.
    emFactory = Persistence.createEntityManagerFactory("jpa-example");
  }

  public EntityManager getEntityManager() {
    return emFactory.createEntityManager();
  }

  public void close() {
    emFactory.close();
  }
}
Now let us write some sample persistence code in our Main method to test everything out –
import javax.persistence.EntityManager;

public class Main {
  public static void main(String[] args) {
    Address address = new Address();
    address.setCity("Dhaka")
        .setCountry("Bangladesh")
        .setPostcode("1000")
        .setStreet("Poribagh");

    EntityManager em = PersistenceManager.INSTANCE.getEntityManager();
    em.getTransaction()
        .begin();
    em.persist(address);
    em.getTransaction()
        .commit();

    em.close();
    PersistenceManager.INSTANCE.close();
  }
}
If you check your database, you will see that a new record has been inserted in your address table.
This article explains how to set up JPA without using any other frameworks like Spring. However it is a very good idea to use Spring to set up JPA because in that case we do not need to worry about managing entity managers, transactions etc. Beside setting up JPA, spring is also very good for many other purposes too.
That’s it for today. In the next article I will try to explain the persistence.xml file and the corresponding configuration values as much as possible. Stay tuned!
The full code can be found at github.


